Use multiple barcode scanners
You have three options to use multiple scanners:
A.) Use single PC with up to four scanners
![]() Connect
up to 4 scanner to a single PC, e.g. wireless
Bluetooth scanners. This is not possible if the PC is networked.
Connect
up to 4 scanner to a single PC, e.g. wireless
Bluetooth scanners. This is not possible if the PC is networked.
B.) Network multiple PCs with one scanner each
You can create a network with multiple PCs or laptops. Each computer can have only one scanner.
Server: One PC must be used as server and run BarcodeChecker in server mode.
Scanners: The other PCs with the scanners must use BarcodeChecker in scanner mode and be connected to the server. If you want to scan tickets with the server PC as well, you can start a second BarcodeChecker in scanner mode on the server PC.
There are two options to network your scanners:
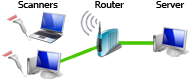
1.) Local LAN or Wi-Fi network (recommended)
 You
get the most reliable network if you use a router to create a local
LAN or Wi-Fi network. Then connect the clients by network cable (LAN) or
wireless (Wi-Fi) to the router.
The server is also connected to the router. An internet
connection is not required.
More...
You
get the most reliable network if you use a router to create a local
LAN or Wi-Fi network. Then connect the clients by network cable (LAN) or
wireless (Wi-Fi) to the router.
The server is also connected to the router. An internet
connection is not required.
More...
2.) Internet (not recommended, experts only)
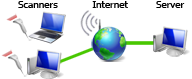 You
can also connect multiple PCs over the internet. For this you must create a
port
forwarding on the router of the server and forward the selected port (default:
port 7610) to the network IP that is shown in BarcodeChecker.
You
can also connect multiple PCs over the internet. For this you must create a
port
forwarding on the router of the server and forward the selected port (default:
port 7610) to the network IP that is shown in BarcodeChecker.
Check tickets in a network
Show step-by-step instructions.
Preparation: Create event, export BarcodeChecker file
1.) Install the TicketCreator software on a PC.
2.) Create an event with barcodes and print tickets with TicketCreator. Then
save the BarcodeChecker file of the
event from TicketCreator.
or
Create an BarcodeChecker file for other tickets with
TicketCreator.
3.) Copy the BarcodeChecker file to all PC used to check tickets.
4.) Install the BarcodeChecker software on the server and all clients.
Start server
1.) Select one PC as server. Start the BarcodeChecker on it, press 'Start Server' and open the BarcodeChecker file.
2.) Enter then port where the server accepts connections.
3.) Set the password required for the clients to connect to the server.
4) The server is now running. Note the IP address and the port of the server, which you need to start the clients.
Start clients
1.) Start the BarcodeChecker on each client PC, press 'Start Client' and open the BarcodeChecker file. If you want to use the server PC also to check tickets you can start a second BarcodeChecker in client mode on it.
2.) Activate the check box 'Connect to BarcodeChecker-Server'.
3.) Enter the IP address and the port of the server and the password.
4.) You can restrict the access by accepting either all tickets or only tickets of certain sections. If you allow only certain tickets to enter, you can also set whether this is an outer door (permits only single admission) or an inner door (accepts also tickets that have already been scanned at the outer door). General area and a restricted area.
5.) Connect scanner and test it.
6.) Now you are set to scan tickets.
If the client loses the connection to the server, it uses a local database instead, containing all tickets scanned at this door. You are also prompted to reconnect to the server.
C.) Multiple scanners without network
 If your
location has
multiple entrances you can check the barcode tickets
independently with one PC or laptop at each door and without a network. Hereby, the
location must be divided into sections and tickets for each
section must only be accepted at one entrance, i.e. the BarcodeChecker software
must be set that for example tickets for section A are
only accepted at door A, tickets for section B only at door B, and so on.
If your
location has
multiple entrances you can check the barcode tickets
independently with one PC or laptop at each door and without a network. Hereby, the
location must be divided into sections and tickets for each
section must only be accepted at one entrance, i.e. the BarcodeChecker software
must be set that for example tickets for section A are
only accepted at door A, tickets for section B only at door B, and so on.
 You
can also create an event where e.g. all visitors are allowed to enter the
general area, but only certain visitors are allowed to enter the
restricted area. For example, you could create an event with
the sections "Exhibition" and "Exhibition + workshop". The entrance to the
exhibition accepts tickets for both sections, however the entrance to the
workshop accepts only tickets for the section "Exhibition + workshop".
You
can also create an event where e.g. all visitors are allowed to enter the
general area, but only certain visitors are allowed to enter the
restricted area. For example, you could create an event with
the sections "Exhibition" and "Exhibition + workshop". The entrance to the
exhibition accepts tickets for both sections, however the entrance to the
workshop accepts only tickets for the section "Exhibition + workshop".